Best budget led strip lights for gaming room setups come down to three things: decent brightness, reliable control, and a kit that won’t peel off your wall after a week. You can absolutely get a clean RGB vibe without paying “streamer tax,” but you do have to avoid a few common traps.
If your room lighting feels “almost right” but still looks patchy on camera, or your strip flickers when your PC and console are both on, you’re not alone. Cheap LED strips can look great in product photos and still disappoint in a real gaming space because the room has heat, dust, textured paint, and long cable runs.
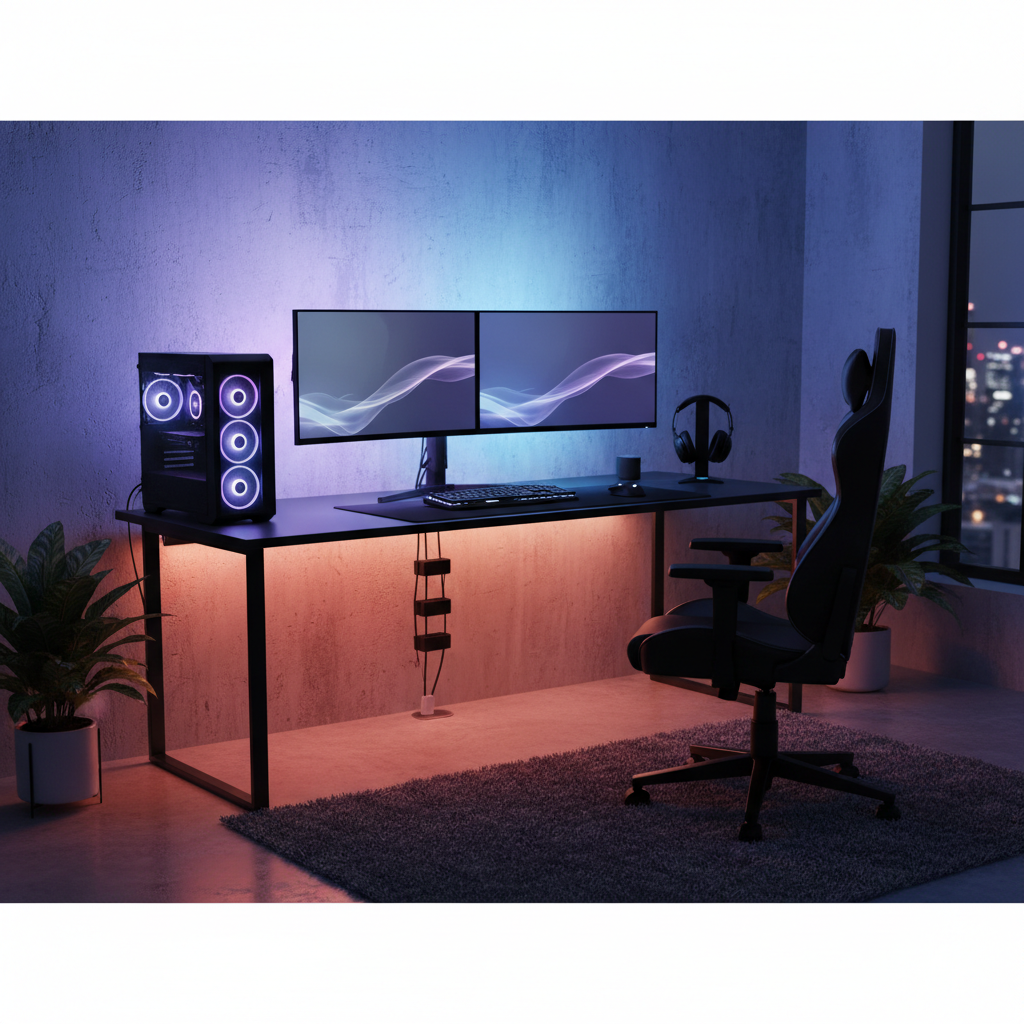
This guide focuses on what to buy and how to install it so it stays put, syncs the way you expect, and looks smooth in the spots gamers actually care about: behind monitors, under desk edges, shelves, and wall corners.
What “budget” LED strips should still do well
Budget doesn’t have to mean “toy.” In practice, the strips that feel worth it tend to hit a few minimums, even if they skip premium extras like ultra-dense LEDs or perfect color calibration.
- Stable brightness and color: you want consistent output across the whole run, not a bright start and a dull tail.
- Low-fuss control: a usable phone app or a responsive remote, ideally with basic scenes and timers.
- Solid adhesive: many “cheap” failures are actually mounting failures, not LED failures.
- Reasonable white mode: even gamers use white light sometimes, and many RGB-only strips produce a harsh blue-ish “white.”
- Safe power: a properly rated power brick and clear voltage labeling, especially for longer runs.
According to UL Solutions, using safety-certified electrical products helps reduce fire and shock risk, which matters when you’re running strips near fabric, carpets, and desk clutter. If a listing looks sketchy, it’s usually not worth the savings.
Quick comparison table: pick the right type for your room
People get stuck because “LED strip light” can mean a few different technologies. This table is a fast way to match the strip type to what you’re trying to achieve.
| Type | Best for | Typical pros | Common downsides |
|---|---|---|---|
| RGB (color only) | Ambient color behind desk/TV | Cheapest, easy to find, fun effects | “White” looks off, color gradients look choppy |
| RGBW / RGBWW | Gaming + usable task lighting | Better real white light, more versatile | Costs a bit more, app quality varies |
| Addressable (ARGB) | Rainbow waves, segmented effects | Smoother animations, “premium” look | More setup complexity, can be dimmer per segment |
| COB strip | No visible dots, close-up installs | Very smooth line of light, great under shelves | Often pricier, bends less cleanly in tight corners |
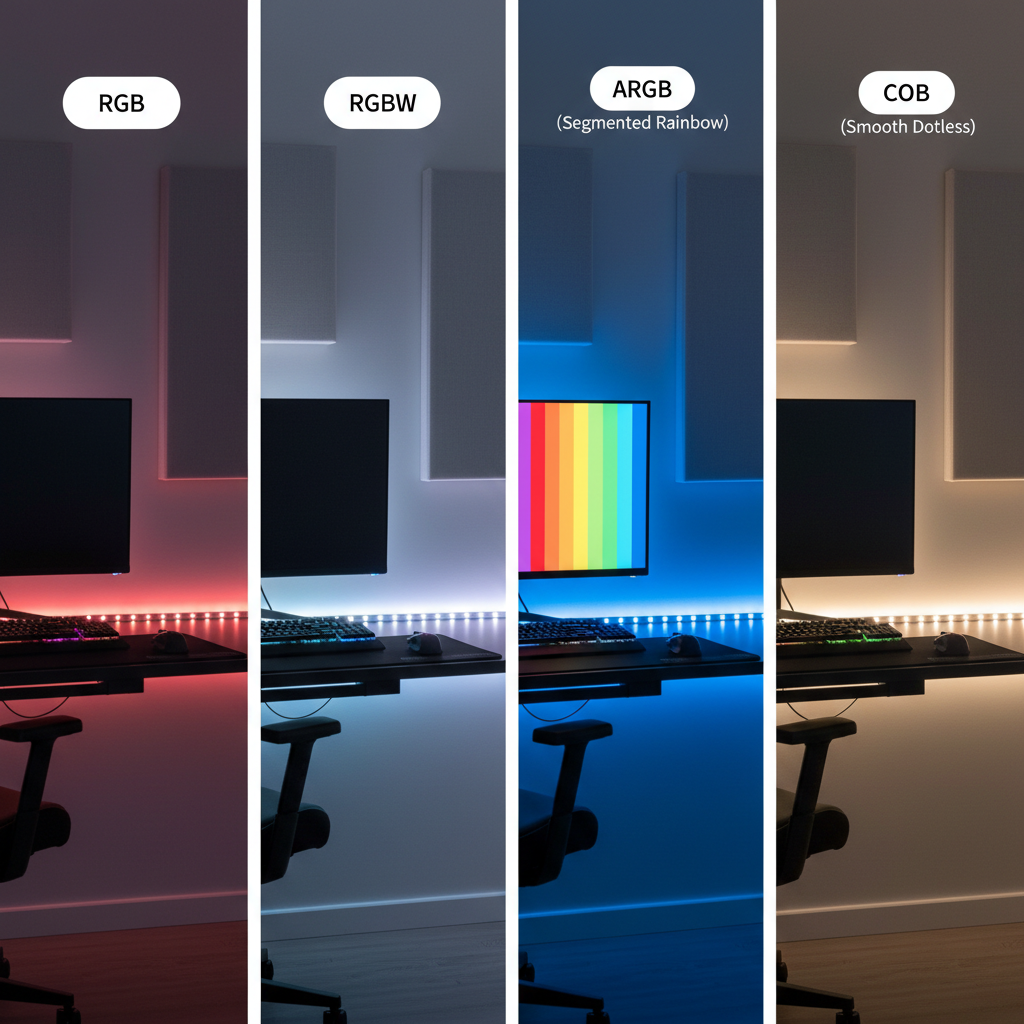
If you mainly want “glow,” basic RGB is fine. If you want your room to function when you’re not gaming, RGBW is usually the sweet spot for the money.
Why budget strips disappoint (and how to spot it early)
The frustration usually isn’t that the LEDs can’t make color, it’s the small stuff that makes the whole setup feel cheap.
- Low LED density creates visible hot spots. Behind a monitor it’s okay, under a shelf you may see dots.
- Voltage drop shows up on long runs as a dimmer far end, especially with 16.4 ft (5 m) kits pushed to full brightness.
- Weak adhesive fails on textured paint, dusty walls, warm PC exhaust zones, or if you reposition once.
- Laggy apps make scene changes annoying, and sometimes the cloud login breaks when the brand sunsets the service.
- No diffusion planning makes even good strips look harsh if they’re directly visible.
One practical tip: if the product page hides the voltage (5V/12V/24V) or power supply rating, treat that as a red flag. You want enough power headroom, not a brick that runs hot.
Self-check: which “gaming room” are you lighting?
Before you buy, identify your main lighting zones. This avoids the classic mistake of buying one long strip and hoping it does everything.
- Monitor/TV bias lighting: prioritizes even glow, low glare, easy on/off.
- Under-desk glow: prioritizes brightness and hidden placement, dots matter less.
- Shelves and wall lines: prioritizes smoothness, corners, and cleaner cable routing.
- Back-of-room ambient: prioritizes reach and scenes, often needs multiple segments.
If you’re mostly on a desk setup, many people get better results using two shorter runs, one behind monitors and one under the desk, rather than forcing a single long run around everything.
Buying criteria that actually matter (without paying premium prices)
When you’re hunting for the best budget led strip lights for gaming room use, these are the specs and “feel factors” that tend to separate a good cheap kit from a regret purchase.
Brightness and power (don’t ignore this)
A strip can have great colors and still look weak in a room with overhead lights or sunlight. Look for clear power info, and be realistic about where you’ll use it. Under-desk lighting can be dimmer, wall washing usually needs more output.
- 12V or 24V strips often handle longer runs more gracefully than 5V kits.
- Long runs benefit from power injection or splitting into segments, even on a budget.
Control options: remote, app, voice
Many budget kits ship with both an IR remote and an app. That’s not redundant; the remote is the “it always works” fallback when Wi‑Fi acts up.
- Prefer kits with local control that still work if the app is down.
- If you want voice control, check compatibility with your ecosystem, but don’t pay extra if you’ll never use it.
Color quality and white light
If you want occasional clean white for tidying your desk, building a keyboard, or just not living in neon, consider RGBW/RGBWW. Budget RGB strips can produce a white that looks icy or slightly purple in many rooms.
Adhesive and mounting accessories
This is where many “budget” kits silently cut corners. Look for included clips, corner connectors, or at least enough lead wire to place the controller where you can reach it.
Installation playbook: make cheap strips look expensive
Good placement beats fancy features. If you do the basics well, budget lighting can look clean and intentional.
1) Plan the run like you plan cable management
Measure twice, then decide where the controller and power brick will live. Hiding the strip is easy, hiding the controller lump is what usually breaks the look.
- Mark corners and where you need jumps around monitor arms or desk legs.
- Keep the receiver/controller in a reachable spot, especially if it uses an IR remote.
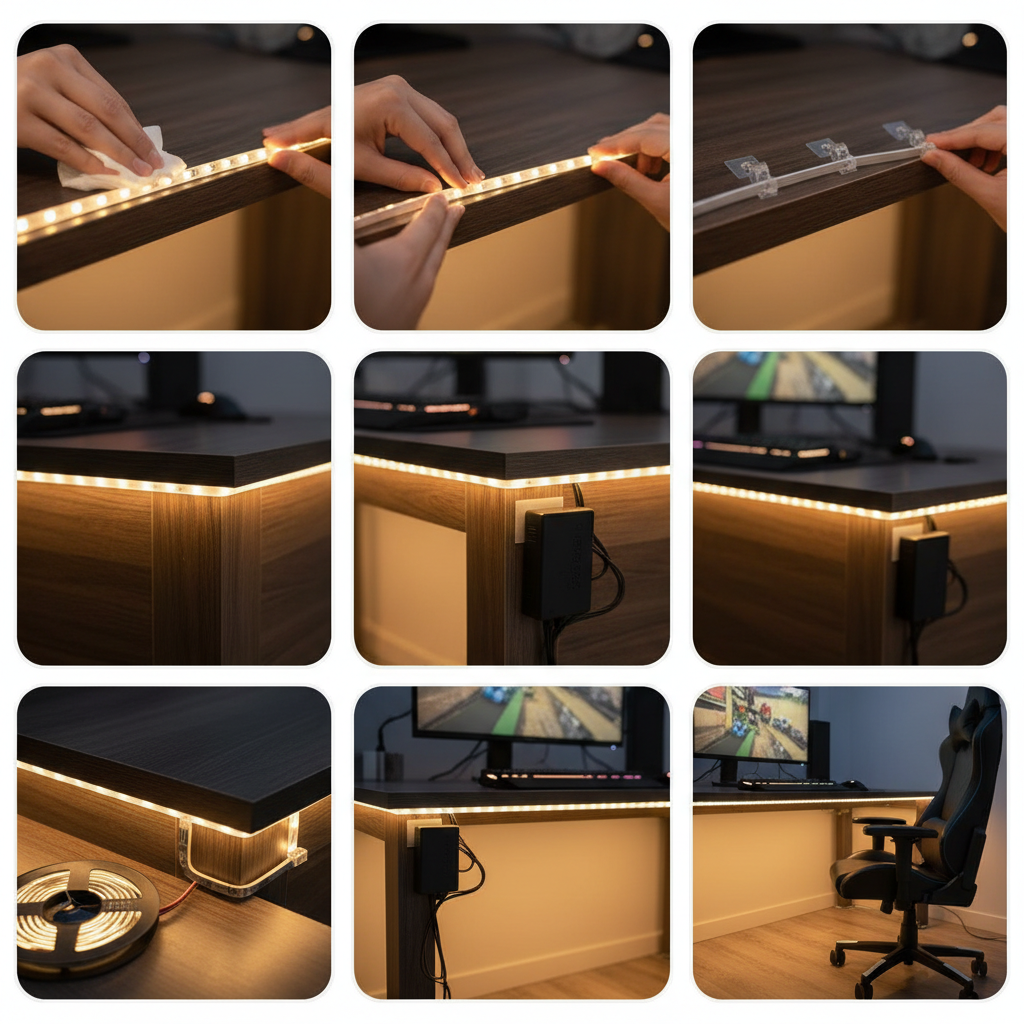
2) Prep surfaces so the adhesive can win
Most peel-offs happen because the surface has dust, oil, or texture that adhesive can’t bite into.
- Clean with isopropyl alcohol on a lint-free cloth, then let it fully dry.
- On textured walls, use mounting clips or LED channels instead of trusting tape alone.
3) Avoid sharp bends and stress points
Sharp corners can damage traces and cause flicker later. Use corner connectors where possible, or create a gentle loop that stays hidden.
4) Tune scenes for gaming, not for the app demo
Many built-in modes look chaotic in a real room. For daily use, pick two or three scenes you actually like: a dim bias glow for nighttime, a brighter “cleaning” white, and one hype mode for parties.
Safety, common mistakes, and when to ask for help
LED strips are low voltage, but the power supplies plug into the wall and can run warm. Treat this like any other home electronics project.
- Don’t overload: avoid chaining more length than the kit supports, it can cause overheating or unstable colors.
- Give the power brick air: don’t bury it in blankets or a sealed drawer.
- Use the right voltage: mixing 5V/12V/24V parts is a common way to ruin a strip quickly.
- Mind flammables: keep strips and bricks away from paper stacks, curtains, and anything that traps heat.
According to the U.S. Consumer Product Safety Commission (CPSC), consumers should follow manufacturer instructions and discontinue use of electrical products that show damage, overheating, or unusual smells. If you notice flickering paired with heat, unplug and troubleshoot instead of “waiting it out.”
If your plan involves hardwiring, routing through walls, or modifying outlets, it’s usually smarter to consult a licensed electrician. Also, if you rent and care about your deposit, test adhesives in an inconspicuous spot or use removable mounting options.
Key takeaways (so you can buy once)
- Choose the strip type based on your zone: RGB for glow, RGBW for usable white, addressable for effects, COB for smooth lines.
- Power and control matter more than flashy modes, especially in longer runs.
- Mounting prep is the difference between “budget” and “looks premium.”
- If you’re comparing kits, the best budget led strip lights for gaming room use are the ones that you can control reliably every day, not the ones with the most effects.
Conclusion: a practical way to choose for 2026
You don’t need to chase the most talked-about brand to get a great look in 2026, you need a strip that matches your layout and doesn’t add friction. Start by lighting behind your monitors for bias glow, add an under-desk run if you want more presence, and only then expand to shelves or wall lines.
If you want one simple next step, measure your monitor-back and desk edges tonight, then buy the shortest kit that covers those zones cleanly, with a control method you’ll actually use. That approach usually beats gambling on a single giant roll.
FAQ
What length LED strip is typical for a gaming desk setup?
Many desk setups do well with one 6.5–16.4 ft run behind monitors plus a separate run under the desk. The right length depends on your desk width, monitor count, and whether you’re wrapping the back edge or just the top span.
Are RGB strips bad for white lighting?
They’re not “bad,” but many budget RGB kits create white by mixing colors, which can look bluish or slightly tinted. If you care about white light, RGBW or RGBWW is usually a safer bet.
Why do my LED strip lights flicker when my PC is under load?
Flicker can come from a weak power supply, a loose connector, or electrical noise on shared power. Try a different outlet, reduce brightness, or use a higher-quality adapter; if you’re unsure, asking an electrician is reasonable.
Do I need diffusers or LED channels for a gaming room?
Not always. Behind a monitor, bare strips often look fine because you don’t see individual LEDs. Under shelves or anywhere the strip is visible, diffusers can make a budget strip look dramatically cleaner.
Is “music sync” worth it on cheap LED kits?
It can be fun, but it’s also one of the first features that feels gimmicky if the microphone is overly sensitive or laggy. If you’ll use it weekly, sure; if not, prioritize stable scenes and easy dimming.
Can I cut LED strips and still use them?
Many strips are cuttable at marked points, but the experience varies by kit. Cutting can reduce flexibility for returns and sometimes makes connectors flaky, so confirm cut points and connector options before you commit.
What’s the biggest mistake people make when buying budget LED strips?
Buying for effects instead of layout. A simple, bright, reliable strip placed well usually looks better than a feature-packed kit installed with visible dots, sagging tape, and a controller dangling off the back of the desk.
If you’re trying to pick the best budget led strip lights for gaming room upgrades without spending hours comparing listings, focus on your main zone first, then match strip type and power to that one job, it’s the most reliable way to get a result you’ll still like a month later.